|
| |
Download the
Microsoft Word file
Introduction to PowerPoint Session 2
Download the supplementary
files for
session 2.
Introduction To PowerPoint
Session #2
GOALS
Participants will learn in session 2:
- How to insert clip art, and pictures.
- How to add sounds to slides or objects on a slide.
- How to add transitions to slides.
- How to add animation effects to slides.
- How to add custom animation effects to slides.
OBJECTIVES
- Incorporate graphics, graphs, sounds, and tables into our presentation.
- Add transitions, animation, and special effects into our presentation.
AGENDA & ACTIVITIES
- Introductions & Opening Activities » 10
minutes
- Introduction of my assistants and myself.
- Workshop agenda.
- Make sure that everyone has signed in on the "Sign In Sheets".
- Make sure that each participant has a copy of the handouts.
- Check to see if participants have done their "homework" (a
PowerPoint presentation without animation).
Question & Answer Time On Using PowerPoint. »
5-10 minutes
Participant questions about information that we covered in the first
session (that will not be covered in this session).
Preparation For The Second Session. » 5-20
minutes
Install Clip Art and graphics on participant’s computers (at least copy
a few clip art files and digital graphics to the desktop).
Have participants copy the practice PowerPoint Presentation from the
3.5" disk drive to their desktop.
Hands On Exercises » 45-90 minutes
Adding Clip Art & Graphics
- One of the easiest ways to add clip art is to:
- create a new slide (Insert Menu / New Slide… or Ctrl M),
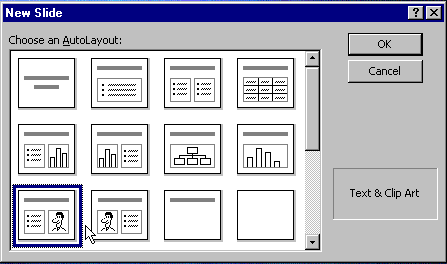
choose the Auto Layout design that has the link to add clip art.
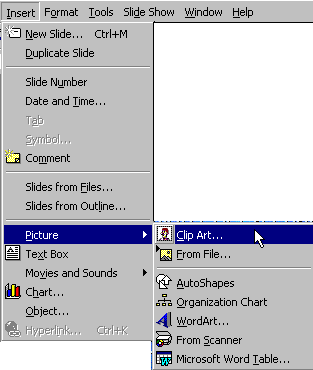
You could also use the Insert Menu / Picture / Clip Art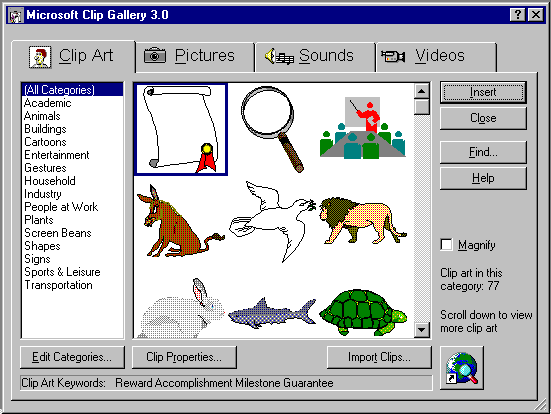
Make sure that the Clip Art Tab is in the forefront (click once on it if
not)- Click to select the item you want to use, and click Insert.
- To add digital graphics that are already installed on your computer’s
hard drive to your presentation:
- Follow the steps to insert Clip Art (step 4.1.1.3 )
- Click once on the Tab "Pictures" and click once to select
the picture of your choice.
- If the Clip Art or Picture is not registered with Microsoft’s Clip
Gallery:
- Click the button "Import Clips" and locate the clip art or
digital graphics on your hard drive.
To add sounds to a slide or object:
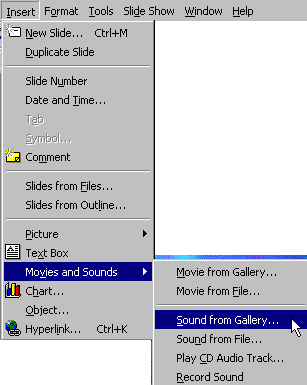
Insert Menu / Movies and Sounds / Sound From Gallery… (gives you access
to sounds that are included with PowerPoint)
Insert Menu / Movies and Sounds / Sound From File… (Gives you access to
sounds that are installed on your computer’s hard drive. You must help
the software find these files.)
Adding Slide Transitions And Animation Effects.
- Slide Transitions can be added to slides in any of PowerPoint’s
different views (Slide, Slide Sorter, Outline, etc.), but it is the
quickest and easiest to do in the Slide Sorter View.
- Change to slide sorter view
- View Menu / Slide Sorter
- Or use the slide sorter icon in the lower left of the screen.
- In this view, a new toolbar appears, called the slide sorter toolbar.
- You can select each slide individually by single clicking on it, and
create a different transition and / or effect for each slide from the pop
up menus on this new toolbar.
- Or you can Select All slides in your presentation and assign the same
transition and effects.
- You can also Select All slides in your presentation and choose
"Random Transition" and / or "Random Effects".
- For now, let’s assign "Random Transition" to all slides.
- Go to the Edit Menu and choose "Select All"

All the slides have a black rectangle outlining them signifying that
they have been selected.- On the slide sorter toolbar click on the icon for Slide Transition.
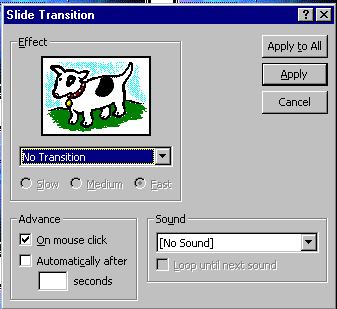
A new dialog box appears giving you control over the transitions:- You can choose the type of transition, the speed of the transition,
and a sound to accompany each transition from this dialog box. (Remember
now that we are working with all slides. You could use this process to
control the transition for each and every slide, using a different
transition and / or sound on each slide.) The picture of the cow
demonstrates a sample of the transition you choose.
- Click on the pop up menu and choose "Random Transition". (If
you choose a sound, remember that you will hear that sound for every
slide...)
- Click the button "Apply To All"
Animation not only determines the order that objects appear on each slide,
but also the effect that each object has when it appears. This is done best
on a slide by slide basis, and is best accomplished in "Slide
View". (IMHO)
- To change to "Slide View":
- Go to the View Menu and select Slide.
- Or choose Slide View from the View Toolbar in the lower left corner to
the screen.
- If you don’t see the "Animation Effects" floating toolbar on
your screen:
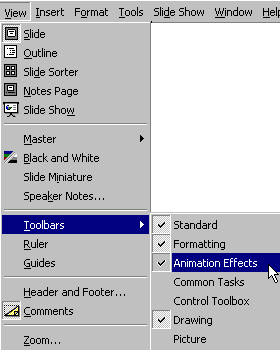
View Menu / Toolbars / Animation Effects
- Take a minute to move your cursor over the various objects on this
toolbar. Don’t click on any yet, but read the descriptions of each.
- The icons in the top row determine whether you want the title animated,
or the text in the "body" of the slide animated.
All of the icons in the second and third "row" are quick
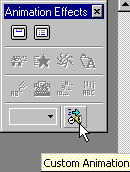
shortcuts to a few of the animation effects.- I prefer to choose the Custom Animation settings in the bottom row.
This brings us to our fifth goal, Custom Animation. (In our practice
presentation, use the Page Down key to go to the slide with the traffic
signal and car.)
- Click on the Custom Animation button to begin.
- This brings us to a series of dialog boxes where we can choose each
function by its named Tab.
- The first tab, Timing, allows us to select which objects on the slide
will be animated and in which order.
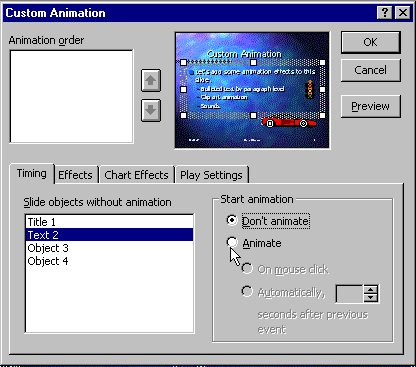
Click "Text 2" and click the radio button "Animate"
(Make sure the radio button "On Mouse Click" is also selected if
you want to manually control each animation). Next, click "Object
3" and the button "Animate". Repeat this with "Object
4".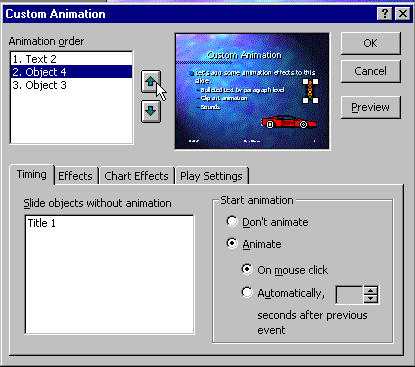
Click "Object 4" in the "Animation Order" box, and
click the "Up Arrow", so that the traffic light will appear on
the slide before the car.- Click the tab "Effects"
- Click "Text 2" in the Animation Order box
- Select "Fly From Left" as the Entry Animation and sound
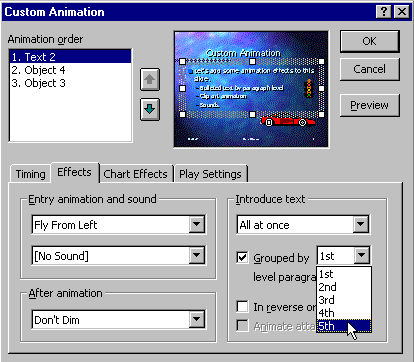
Select "Grouped by 5th level paragraphs" if you’re
not sure how many levels of bulleted text you have. (This allows each
bulleted item to appear one at a time.)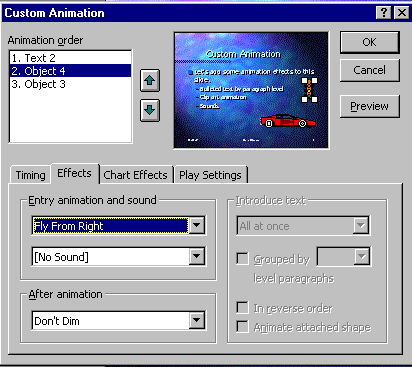
Click Object 4, and apply the Fly From Right animation for the traffic
light.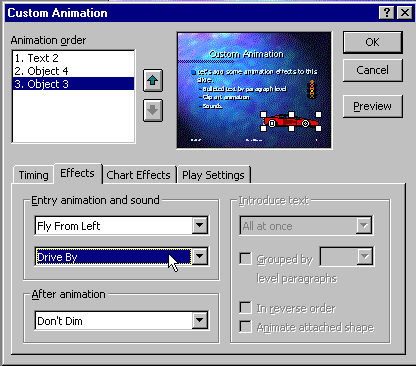
Click Object 3, apply the animation setting Fly From Left, and choose the
sound "Drive By" from the pop up menus.- The "Chart Effects" tab applies to slides with charts.
- The "Play Settings" tab allows you to control audio and video
clips, and how they will play during a slide show. Since we aren’t
covering that in today’s lesson, we will move on (if we end up with some
extra time, ask me about this if you are interested).
- Click OK
- Use the floating Views Toolbar at the bottom left corner of the screen
and choose Slide show.
- Click the mouse or press the right arrow key to "animate" each
element on this slide.
- After you verified your work by watching it on the screen, press Escape
to return to slide view.
- Repeat this process (steps 4.5.1 through 4.5.17) for each slide in your
presentation to customize the animation of each element on each slide.
- Enjoy!
Break » 15 minutes
Participants Work On Their Own Presentations. »
15-50 minutes
Adding Clip Art and Graphics
Adding Sounds
Adding Slide Transitions
Adding Custom Animations
"Show & Tell" Participants Presentations »
15-20 minutes
Demonstrate Internet Assistant for PowerPoint (if time) »
5-20 minutes
Show the Translation Process
Demonstrate these slides on the Internet
Demonstrate PowerPoint Animation Player Plug-In
Discuss pros and cons of each medium.
How to get and install Internet Assistant
Group Reflection » 5 minutes
Quickly share ideas you have had about using PowerPoint.
Conclusion » 5 minutes
PowerPoint is a great way to make presentations (even on the Internet).
Fill Out Evaluation Forms » 5 minutes
Notes:
|
